
Tips and tricks on my Lightsail instance, configuration and common commands.
Removing the bitnami banner
Documentation that shows how to remove bitnami banner is outdated for new instances. New instances on Lightsail don't have a bitnami banner page, which I thought was unnecessary to begin with.
You have all of the information after you connect to your instance for the first time.

Login to wordpress instance for the first time with bitnami_credentials, and same password but root user to access phpmyadmin.
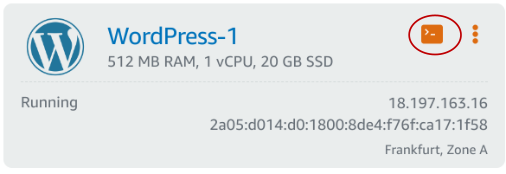
Connect to instance
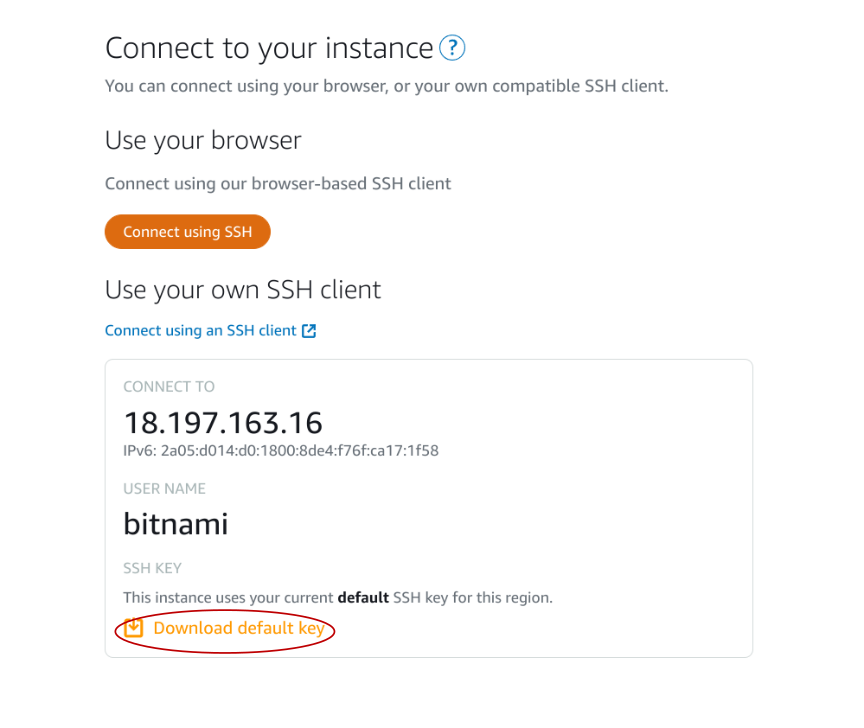
You can connect directly from the web by clicking on the instance terminal icon
Or download ssh key to your computer and access like ssh -i <location_of_your_pem_file> bitnami@<ip_address>. I use both options.
Access phpmyadmin
Create an ssh tunnel with
ssh -N -L 8888:127.0.0.1:80 -i <location_of_pem_file> bitnami@<ip_address>And access your phpmyadmin on http://127.0.0.1:8888/phpmyadmin. Login with root and bitnami_application_password (read from that file after connecting to instance).
Setup Cloudflare SSL certificates
Only if your domain is behind Cloudflare, otherwise skip this step. Btw, I've covered enabling full encryption for Cloudflare domains in more detail.
To create certificates go to Cloudflare -> SSL/TLS -> Origin server -> Create certificate -> Create.
Save certificate as server.crt and private key as server.key.
Connect to your instance, backup your existing certificates and replace with Cloudflare's.
On my instance, certificates are located at /opt/bitnami/apache/conf/bitnami/certs.

Restart apache after applying changes.
/opt/bitnami/apache/conf/bitnami/certs$ cp server.crt server.crt_legacy /opt/bitnami/apache/conf/bitnami/certs$ cp server.key server.key_legacy /opt/bitnami/apache/conf/bitnami/certs$ nano server.crt # paste from Cloudflare first field
/opt/bitnami/apache/conf/bitnami/certs$ nano server.key # paste from Cloudflare second field
Assign permissions to certificates
You also need to ensure that the appropriate file permissions are set for SSL certificate files in Apache.
Same rule goes with Nginx or any other proxy server.
- Private Key: (400 --> file is readable by the owner only)
chmod 400/opt/bitnami/apache/conf/bitnami/server.key
- Certificate File: (444 --> file is readable by all and cannot be modified or executed)
chmod 444 /opt/bitnami/apache/conf/bitnami/server.crt
Restart apache after applying changes.
sudo /opt/bitnami/ctlscript.sh restart apacheChecking the certificate issuer
You can check if you installed the correct certificate by checking who the issuer is from the instance terminal. Locally your site will be available at localhost.
echo | openssl s_client -servername localhost -connect localhost:443 2>/dev/null | openssl x509 -noout -issuer
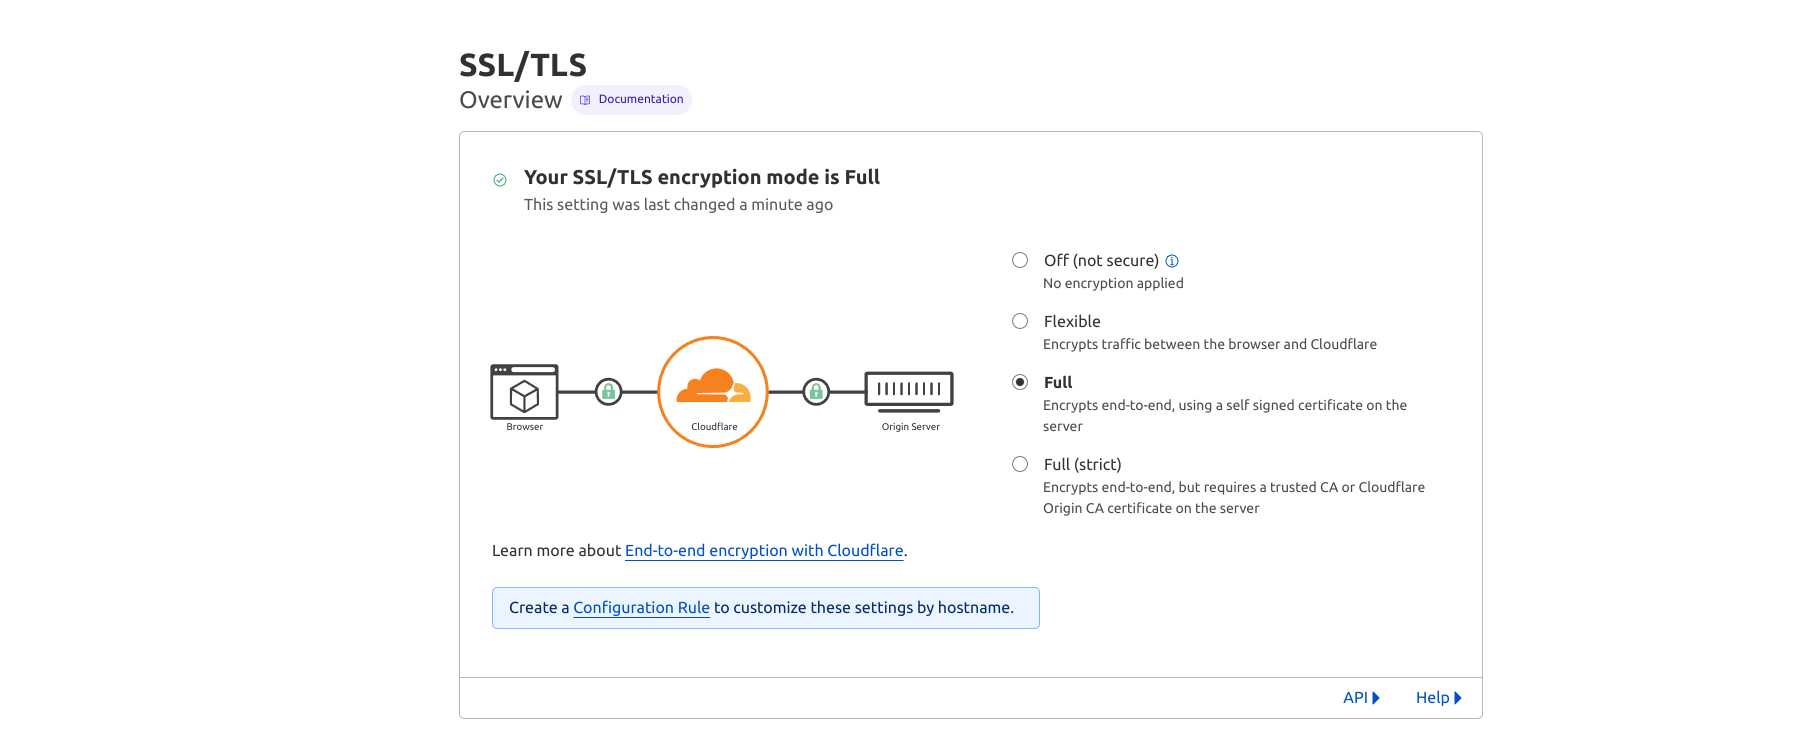
Enable Full SSL encryption
Now go back to Cloudflare SSL/TLS Overview page and change encryption to full, as you have already installed certificates on your lightsail instance.
Apache Optimizations
Pagespeed
If you have a weak instance (first 3 are weak in my opinion), and most of the time I pick one of the first 3, you don't need pagespeed. Pagespeed modules on apache help optimize content delivery. On the other hand, pagespeed optimization is resource consuming. That means you might sometimes get a 503, or your instance might become unresponsive. I recommend rather excluding a pagespeed from httpd.conf.
cd /opt/bitnami/apache2/conf/httpd.confComment lines and restart apache.
#Include conf/pagespeed.conf
#Include conf/pagespeed_libraries.conf
Cors
By default, cross origin resource sharing is disabled on the Bitnami instance. Since I think it's one of the important security measures, I like to enable it. Edit the /opt/bitnami/apache/conf/vhosts/wordpress-https-vhost.conf
<Directory /opt/bitnami/wordpress>
...
# Begin CORS
SetEnvIfNoCase Origin "https?://(www\.)?(yourdomain\.com)(:\d+)?$" MYORIGIN=$0
Header set Access-Control-Allow-Origin %{MYORIGIN}e env=MYORIGIN
Header set Vary Origin
# End CORS
...
</Directory>
Vary indicates to browsers that server responses can differ based on the value of the Origin request header. I added it because it's recommended with Access-Control-Allow-Origin header.
Origin is defined in the MYORIGIN variable.
Restart apache server.
Some other configs I use
Often I need to proxy pass to another instance or add a redirect to a broken page. Since I don't like having more wp plugins than I need to, this is easily done manually. Edit the /opt/bitnami/apache/conf/vhosts/wordpress-https-vhost.conf
<VirtualHost 127.0.0.1:80 _default_:80>
  ServerName www.mydomain.com
  ServerAlias *
  DocumentRoot /opt/bitnami/wordpress
  ...
  ProxyPass /uri http://otherdomain.com/uri
  ProxyPassReverse /uri http://otherdomain.com/uri

  Redirect /brokenurl https://mydomain.com/alturl
Increase max upload size
By default your upload size will be 80M, which is not enough when using all in one wp migration plugin.
To change that, edit sudo nano /opt/bitnami/php/etc/php.ini , find upload_max_filesize, post_max_size, change and restart.
Firewall
Cloudflare has its own firewall, but you might sometimes want to block a suspicious ip when you tail -f ~/stack/apache2/logs/error_log, but with iptables.
sudo su
iptables -A INPUT -s 1.2.3.4 -j DROP
iptables-save > /opt/bitnami/iptables-rules
crontab -e
Add a line at the bottom of crontab, to restore iptables on every reboot.
@reboot /sbin/iptables-restore < /opt/bitnami/iptables-rules
You can also block with a Wordpress plugin like wordfence or wp security, directly from Cloudflare, but this option seems most reliable. E.g. somehow your Cloudflare gets bypassed, or plugin not working for some reason.
Upgrade to the Latest WordPress Version
I prefer updating WordPress through the command line interface (CLI). To do this, connect to your instance and run the following commands:
sudo wp core update && sudo wp core update-dbIf you look at the wp command you'll notice sudo doesn't execute the command, but daemon user does. Wp command is actually:
exec /opt/bitnami/common/bin/gosu daemon /opt/bitnami/php/bin/php /opt/bitnami/wp-cli/bin/wp-cli.phar "$@" If you run into issue with updating your wordpress, like wp core is unable to create a directory, that's a permission issue. Reset your permissions by executing:
sudo chown -R bitnami:daemon /bitnami/wordpress

sudo find /bitnami/wordpress -type d -exec chmod 775 {} \;
sudo find /bitnami/wordpress -type f -exec chmod 664 {} \;
sudo chmod 640 /bitnami/wordpress/wp-config.php
Secure your files and folders
When I'm done with updating, I like to set stricter permissions as recommended by wp security plugin.
sudo find /opt/bitnami/wordpress -type f -exec chmod 644 {} \;
sudo find . -type d -exec chmod 755 {} \;
To successfully run the wp core command, the specified permission rules 775 for directories and 664 for files are required because 775 allows both the owner (bitnami) and the group (daemon) to write to directories (crucial for operations like installing plugins or updates), and 664 grants similar write access for files; however, after running the command, reverting to 755 for directories and 644 for files is important for security, as it restricts write access to just the owner, minimizing the risk of unauthorized modifications.
Create a robots.txt
If your wordpress is located in the /home/bitnami/stack/wordpress, that is where your robots.txt file should be. But for the sake of creating and modifying a publicly accessible file, let's rather modify it somewhere outside and move the final changes to that directory.
So, after you connect, create your robots.txt file in the /home/bitnami directory. That's where your user is located after logging in:
sudo nano robots.txt # add some changes and save
sudo chmod 644 robots.txt # remember that 644 is for restricting write access to the owner!
mv robots.txt stack/wordpress # verify change is applied when going to yoursite.com/robots.txt


