
This guide focuses on configuring subscriptions in an Expo app for both iOS and Android. In this walkthrough, I’m using RevenueCat with Expo SDK 53. The code builds on earlier Firebase integration examples. Repo is a good starting point to demonstrate how to handle linking firebase user to a purchase.
Prerequisites
- Play Developer / Apple Developer Account
- App registered in App Store Connect / Google Play Console
- Configure in-app subscriptions in stores - Check out my earlier guide on configuring subscriptions in the Google Play Console and App Store Connect. It covers the initial setup in detail.
- You have a RevenueCat Account - Sign up at https://www.revenuecat.com/pricing. The free plan is more than enough to get started.
About Entitlements, Products and Offerings
These 3 terms confused me in the beginning, although RC docs explain it pretty well. But I'm a visual person, so I bothered to create a small chart that explains those 3 terms:
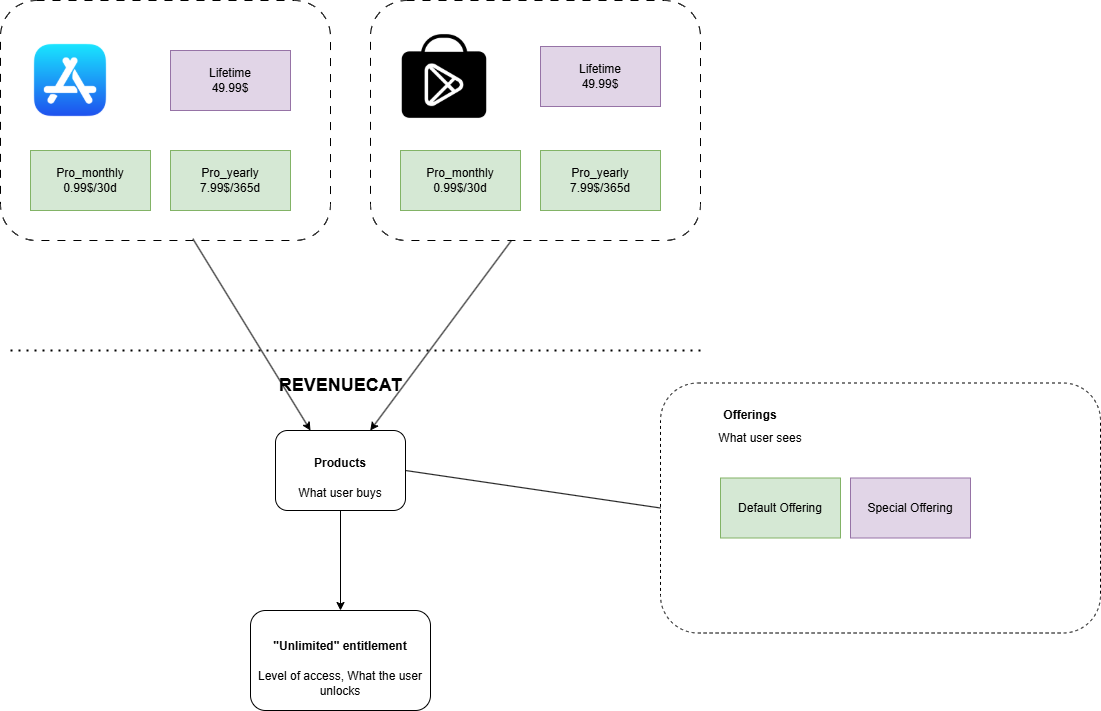
- Products - user buys
- Entitlements - level of access
- Offerings - user sees
You don't manually enter products, you import them after you've linked the stores to the RevenueCat project.
Link Play Console to RevenueCat
To Link to Google Play Store, go to Google Cloud Console and select your project.
Go to Apis and enable Google Play Android Developer API page, Google Cloud Pub/Sub the Google Play Developer Reporting API page.
Go to Api credentials and create a new credential - assign monitoring viewer and pub sub editor. Then open it, click keys, and create a new service account key, json. Paste the contens of the key into RevenueCat.
Copy the service account email and go to Play Console, Users and Permissions. Click to invite the new user, your service account email, select your app, check all boxes from Financial, and you need the "View app information" permission.
To enable real time purchase reporting, check that you have assigned service account in RevenueCat, you should see the "Connect to Google" to allow RC to create a new topic id. Copy that topic id into Play Console -> app -> Monetization setup -> Real-time developer notifications topic id. This step can be done whenever.
If you missed anything, go through the checklist.
Link App Store Connect to RevenueCat
You'll set up 3 keys:
- App Specific Shared Secret - Go to App Store Connect, App, App Information, scroll down to Manage and generate a new secret. Copy it into RevenueCat in the field for App Specific Shared Secret. Used for validating receipts.
- In app purchase key - App Store Connect, Users and Permissions, Integrations, In-app purchase, add a new key, generate it and upload it in RevenueCat. Used for validating transactions.
- App Store Connect API - Same as where you found the In app Purchase, just click to tab above and generate a new key with "App manager" permission. Upload it in RevenueCat. Used for importing products.
You can find the Issuer ID under Integrations.
If you'll be asked for Vendor ID, go to app store connect, Reports/Payments and Financial Reports tab, and you should see the Vendor # in the top left corner of the page.
When your app is set, scroll down to apple server to server notification settings and click apply to app store connect. This will automatically set app store server notifications in your app information.
Check the "track new purchases from server-to-server notifications".
Paywall
I think it's one of the best selling points from RevenueCat! They provide a UI builder that lets you design the subscription screen in the RevenueCat dashboard. You can start from scratch or select one of the premade templates:
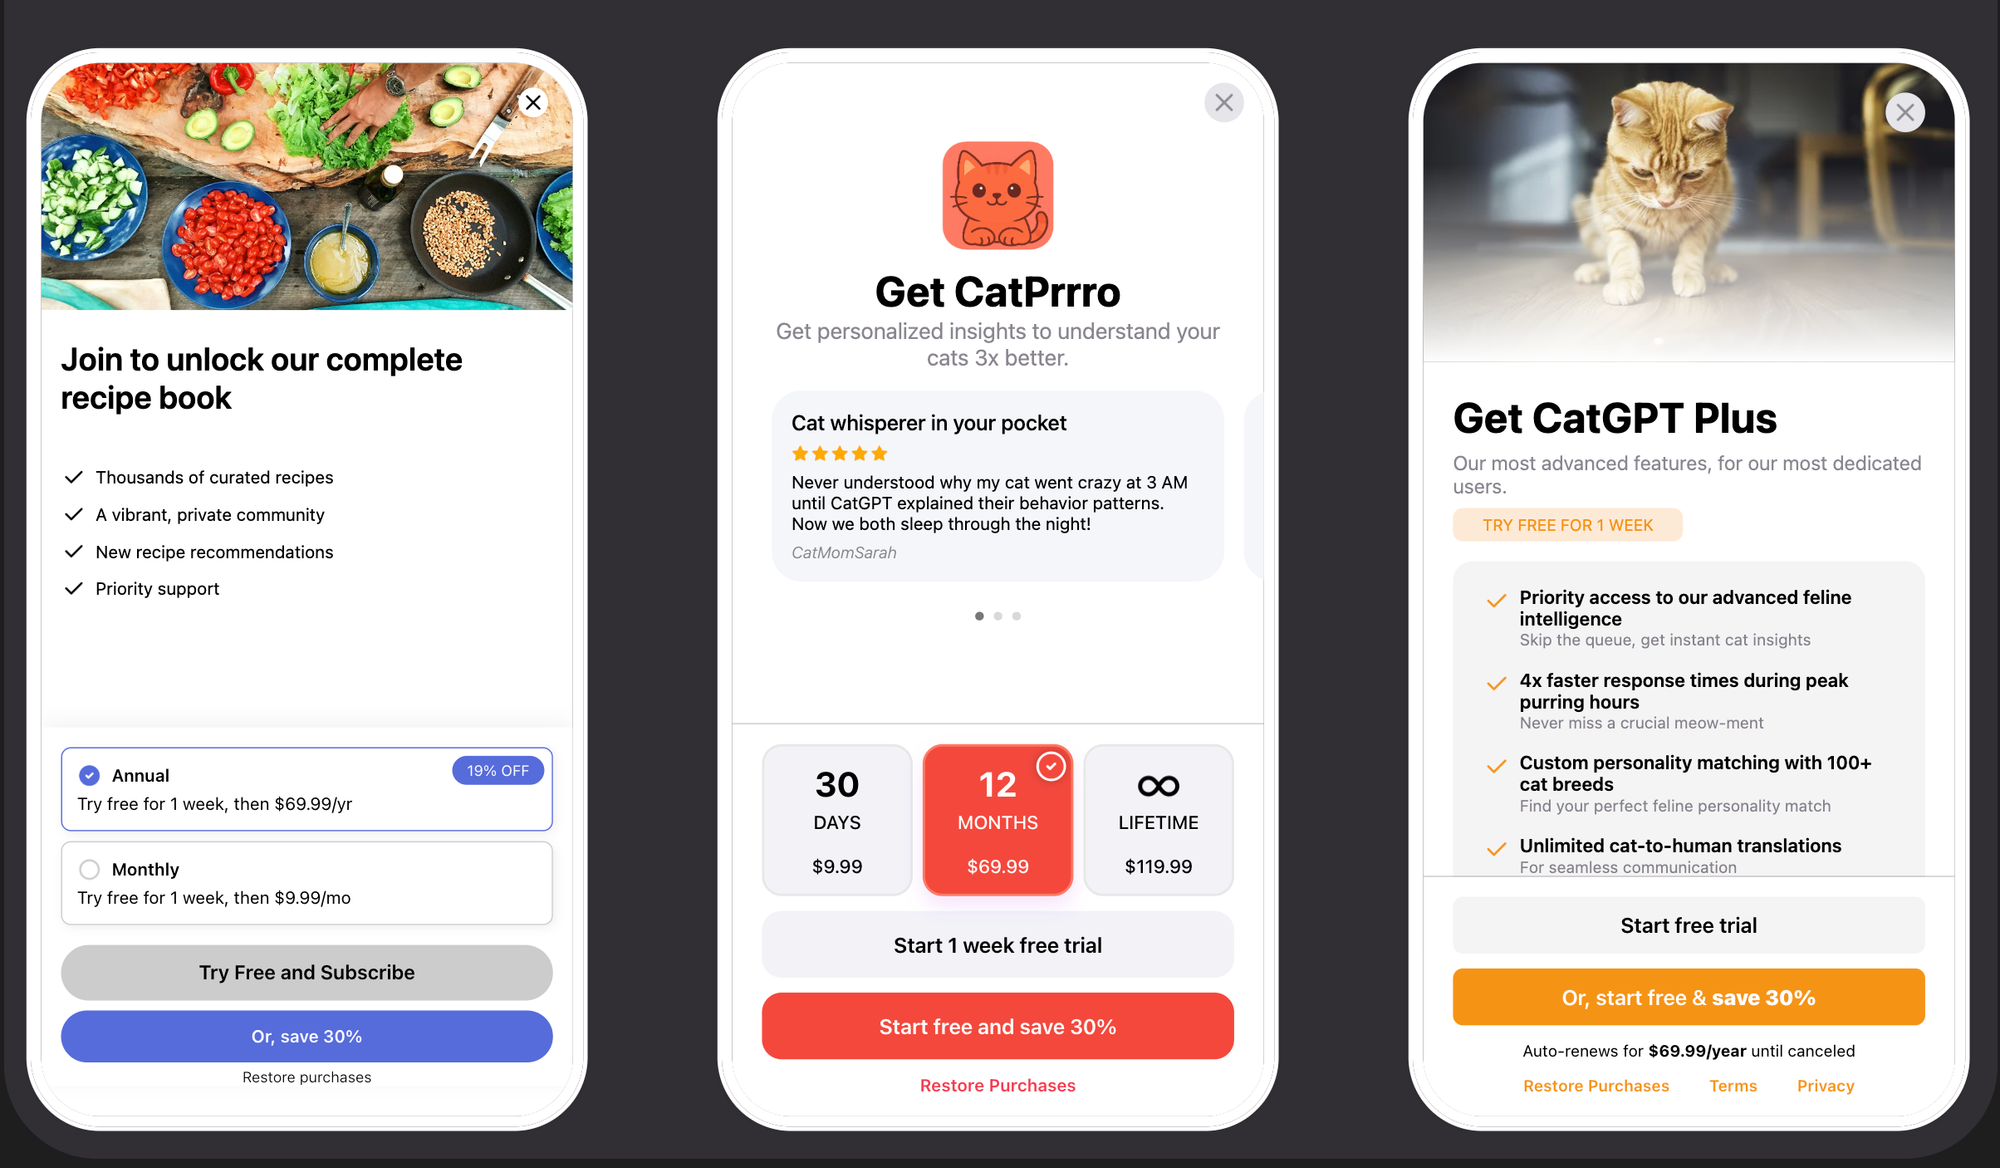
If you decide to start from scratch, your paywall should have:
- valid links to terms of service and privacy policy - in case of Apple, it must match what you put in App Information and App Privacy. By default, your app will have Apple's default TOS.
- restore purchase button
- clear pricing and duration
- list of features that the user unlocks
Configure RevenueCat in the App
npx expo install react-native-purchases react-native-purchases-uiYou cannot test rn purchases in expo go, but bundled expo dev client should work. react-native-purchases-ui is optional, only if you use the RevenueCat Paywall feature. Initialize it somewhere in _layout:
const apiKey = Platform.select({
  android: process.env.EXPO_PUBLIC_ANDROID_RC_API_KEY,
  ios: process.env.EXPO_PUBLIC_IOS_RC_API_KEY,
});
if (__DEV__) {
  await Purchases.setLogLevel(Purchases.LOG_LEVEL.DEBUG);
}
Purchases.configure({
  apiKey,
  appUserID,
  entitlementVerificationMode: Purchases.ENTITLEMENT_VERIFICATION_MODE.INFORMATIONAL,
});
entitlementVerificationMode set to INFORMATIONAL means RevenueCat will verify entitlements, but only log the results. It won't block access if something’s off. It's useful for debugging without affecting the user experience.
Handling Authorized users
Same way that you login and logout, you should update the revenuecat session...
You probably want to link a purchase to a user id. If you are using firebase auth, it will be firebase uid:
onAuthStateChanged(async (user) => {
  if (user) {
    await Purchases.logIn(user.uid);
  }
});
On the web it would be slightly different interface
onAuthStateChanged(async (user) => {
  if (user) {
    Purchases.getSharedInstance().changeUser(user.uid);
  }
});
Verifying entitlements
When RevenueCat is configured, you can ask it to fetch customerInfo. In that case:
const customerInfo = await Purchases.getCustomerInfo();
const isPro = customerInfo.entitlements.active.pro?.isActive
If you named your entitlement "pro", then this would be the query if the user has an active subscription.
What's left is to test it out. I only covered the google testing part. In App Store Connect, you can add a new sandbox user and test with them.
If you want RevenueCat configuration walkthrough, take a look at my youtube video.