
Are you looking to develop a Chrome extension? This guide will walk you through the basics of how to develop a simple Chrome extension, providing you with the tools and knowledge you need to get started.
For me it was not very difficult to build a simple Chrome extension without any prior knowledge of the Chrome extension ecosystem.
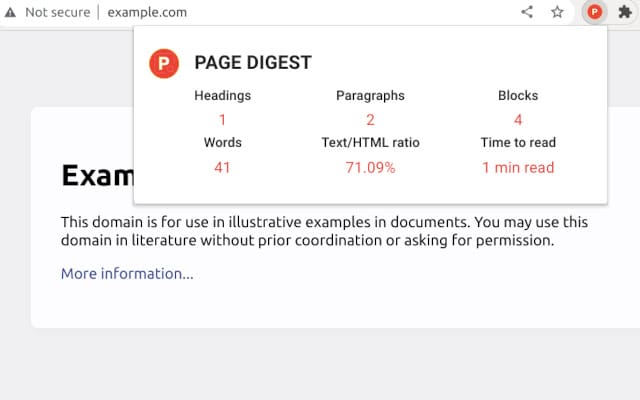
I built a simple extension on top of React and Material UI that generates a web page summary. The summary contains the total number of words, headings, paragraphs, blocks, text-to-HTML ratio, and time to read.
It took me two afternoons to complete the project. I had experience working with React, Material UI, and Webpack, which gave me an advantage. It would have taken only one afternoon, but I really wanted to squeeze in a rust wasm, which I decided was unnecessary for the current stage of the extension.
I'll write about Rust Wasm Chrome extension instructions in another article. It's not that hard with the help of https://rustwasm.github.io/docs/book/game-of-life/introduction.html. There are some differences in the process due to the new version of the manifest.
My extension is free for download at https://chrome.google.com/webstore/detail/pagedigest/ and open source at https://github.com/eisberg-labs/pagedigest. Be gentle with your remarks :) Even though I completed the project in a short time, I missed the testing setup, linting, and formatting checkup.
Maybe the extension won't work in some cases, please report an issue and I'll fix it as soon as possible.

Register as a Chrome Web Store developer
Skip this step if you don't plan to publish your app to chrome webstore.
Go to chrome devconsole, signup and pay the 5$ registration fee. If you're from Croatia, you might get confused that our country is not listed when paying the fee. I paid with Revolut and selected United States. It doesn't matter because you'll enter your correct address and business data when you register.
When asked if your account is trader or not, I personally selected a trader account. This means that you need to specify whether you are selling products or services directly to consumers (trader), or if you are only providing a platform for others to sell products or services (non-trader).
I honestly don't know if I'll be selling anything, but I had to choose something.
Set up the project
You can use my app as a boilerplate or create a new React project using npx create-react-app yourproject. This will generate a basic project structure with all the necessary configuration and dependencies.
Declare your app
To create a Chrome extension, you need to provide a manifest.json file that serves as a specification for your extension, similar to how package.json is used in a Node.js project.
What is your app called? Version number? Describe what does it do? Who's the author?
The manifest file is used to provide a standardized description of your extension, including its name, version number, description, and author information.
When creating your extension, you should declare it using manifest version 3. This version is stricter than V2, which is being phased out. While you can still submit V2 extensions, the review process may take longer.
Manifest V3 offers improved security and performance compared to V2. However, it also introduces some significant changes to how extensions can interact with web pages. For example, certain features such as executing scripts and making external requests are more restricted than in V2.
I haven't looked closely at the differences between the two versions, so you'd better read Migrating to Manifest V3.
I declared my manifest.json in the public directory and just instructed CopyWebpackPlugin to copy everything from public to dist on project build.
First draft:
{
  "name": "PageDigest",
  "description": "Get a quick summary of any web page with PageDigest: word count, characters, read time, text to HTML ratio.",
  "version": "1.0.0",
  "manifest_version": 3,
  "author": "Ana Bujan <[email protected]>",
  "homepage_url": "https://github.com/eisberg-labs/pagedigest",
  "icons": {
    "16": "icon16.png",
    "32": "icon32.png",
    "64": "icon64.png"
  }
}
I just declared a name, version number, description, author information and extension icon. It doesn't do anything...yet.
Build the UI
Build the UI components for the extension, including the popup and any other components that you might need. You can use React to build these components and use tools like webpack and babel to build and bundle your code.
Declare your ui in the manifest.json.
{
  //...
  "action": {
    "default_icon": "icon.png",
    "default_popup": "popup.html",
    "default_title": "Page Digest"
  },
  //...
}
React is set to bootstrap in popup.html.
<!DOCTYPE html>
<html lang="en">
<body>
<noscript>You need to enable JavaScript to run this app.</noscript>
<div id="root"></div>
<script src="main.js"></script>
</body>
</html>
I want my extension to open a popup when clicked ( action key) and display some SEO metrics of a web page.
Write the content script
To interact with a web page you need a content script. And you need to declare a content script in manifest.json
{
  //...
  "content_scripts": [
    {
      "matches": ["<all_urls>"],
      "js": ["content.js"],
      "all_frames": false,
      "run_at": "document_end"
    }
  ],
  //...
}
content.js is injected into all web pages (matches <all_urls>), but only in the main frame, and runs after the document has finished loading (document_end).
When installing or updating a chrome extension, if you've changed the content script, you better restart your browser. While if you've only changed a popup code, you don't need to restart.
In my example, I need a content script to calculate SEO metrics for a web page.
Communicating
Now gluing the content script with popup goes with message passing.
I have a listener registered on content script that listens for message from popup.
chrome.runtime.onMessage.addListener(function(request, sender, sendResponse) {
  // do something and send response
  const contentResponse = process(request); // e.g. match by request.action or any other custom interface
  sendResponse(contentResponse)
})
And popup sends messages to content script:
useEffect(()=> {
    (async () => {
      const [tab] = await chrome.tabs.query({active: true, lastFocusedWindow: true}).catch(err => {
        // error handling
        throw err;
      });

      chrome.tabs.sendMessage<COMMAND, RESPONSE>(tab.id, { action: Command.SOME_COMMAND }).then((response) => {
        // update component state
      }).catch((err: any) => {
        // error handling
      });
    })();

}, []);
To send a message, popup needs to know to which content e.g. tab it should connect to.
And chrome.tabs.sendMessage might fail in cases when:
- you've just installed this chrome extension but didn't restart
- there are no active tabs, you just opened a new chrome
Test and publish
Before publishing to Chrome store you can test your react app in a local environment.
npm run build- Open chrome://extensions
- enable developer mode
- Load unpacked and add your dist directory

You should be able to work with your extension locally. Any extension error will show up in your extension settings errors.
Publishing the extension to chrome store is by zipping your dist directory and uploading to chrome store developers dashboard. You might need to fill in some data, especially if your app needs permissions.
And then you submit and wait for Chrome team to review your app.


