
Meta Ads are another way to drive installs and engagement, alongside Google and Apple Search Ads.
Personally, I haven't had success with Meta Ads. Google and Apple Search Ads worked better for my hobby apps. I didn't spend more than 10 bucks per day and only ran week long campaigns. So take this as a builder's perspective, not a marketer's.
How does it work
User installs or takes an action in your app, event is sent to Facebook. Facebook tracks and optimizes based on this data. But only if you've set your ads campaign to charge based on user actions within the app.
Why would you use it
If you intend to market your app with facebook ads, then best money spent is for the user that actually uses your app. Otherwise, you'll get a lot of inflated downloads worth nothing. The same rule applies for google ads.
Step 1 - Configuration in Meta
Create an App first
Go to https://developers.facebook.com/ and create an App.
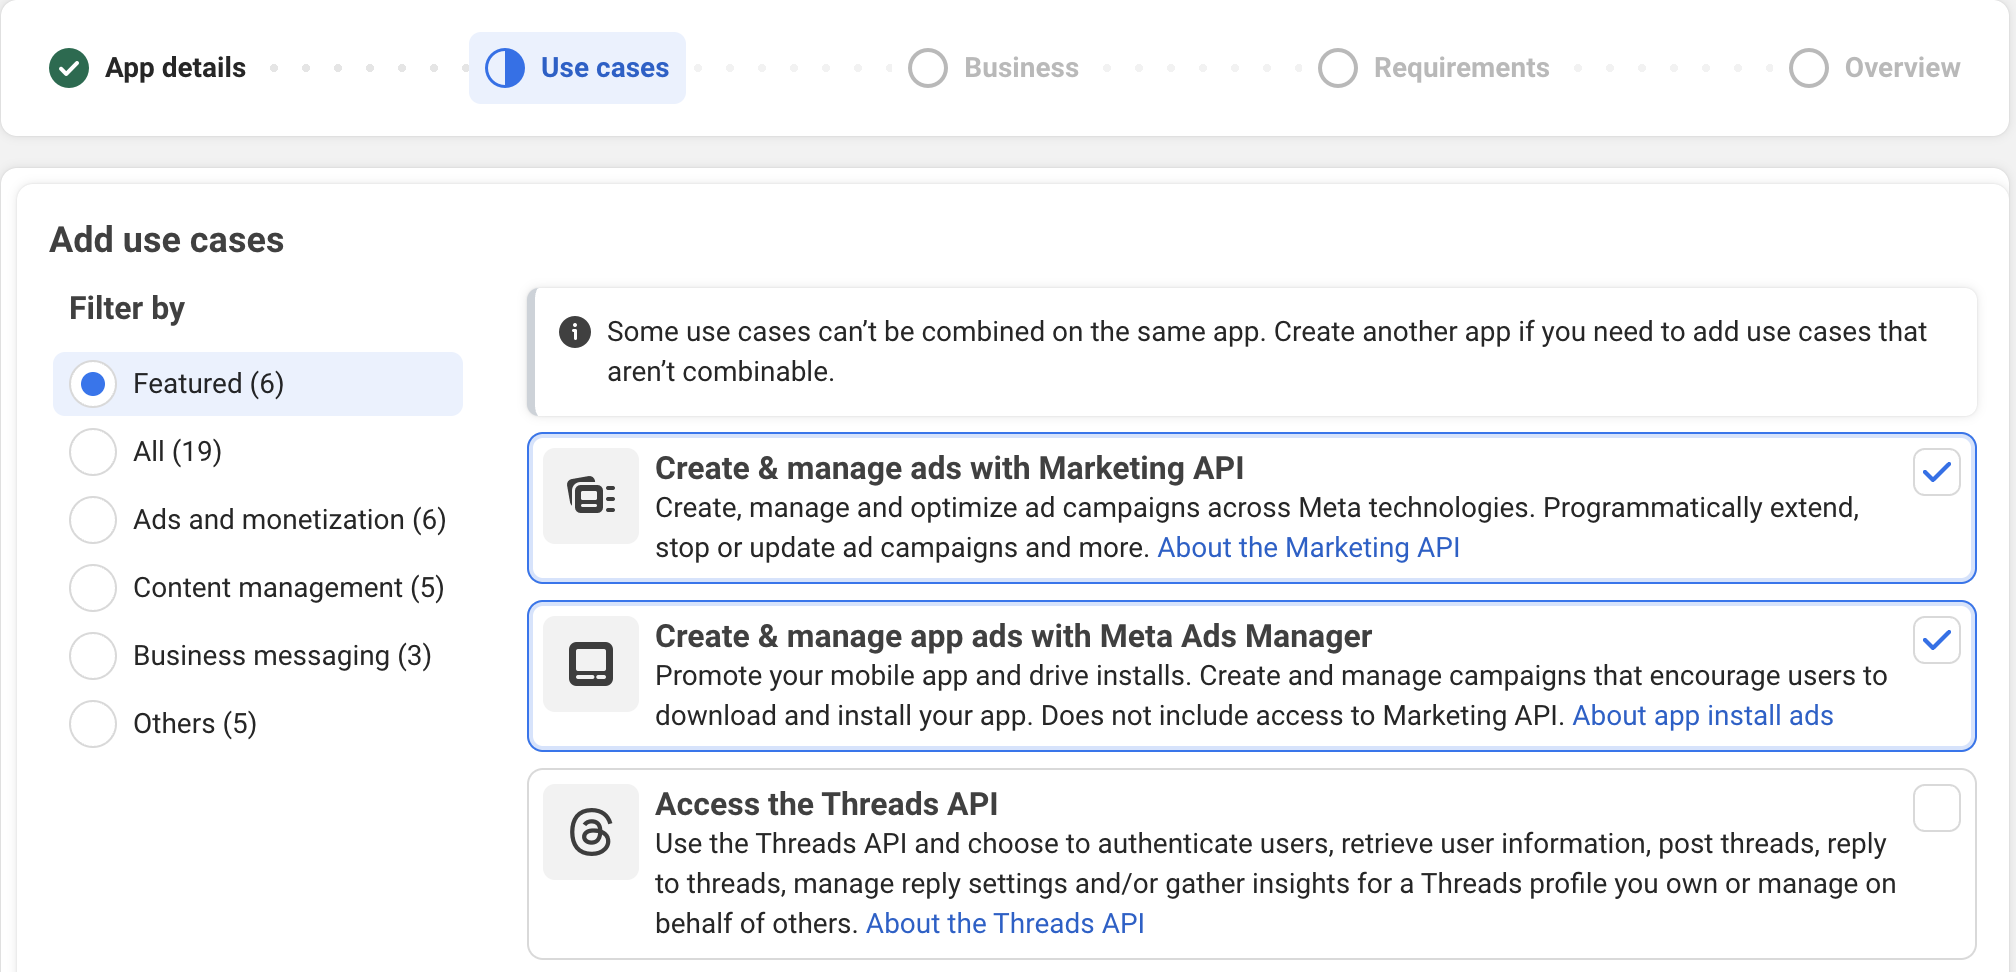
In Use Cases, I'd select "Create & managed ads with Marketing API" and "Create & manage app ads with Meta Ads Manager"
Go to app basic settings, fill privacy and terms of service urls. I think you get asked that when you go on creating ads.
Scroll to bottom of app basic settings and "add a platform":
iOS Platform
When linking to iphone and ipad store id, it's the 10-digit number of your app, found in app store connect, app information, Apple ID.
Scheme will be the slug field from expo app config, although URL scheme suffixes are not available from iOS 16.0, fill that field.
Find the iOS App Shared Secret in App store connect -> App information and scroll to bottom, it's called App-Specific Shared Secret.
Android platform and Facebook Android key hash
Class name is your package name and MainActivity e.g. my.app.MainActivity.
You need to enter class name, package and Key Hashes.
If you’re not used to Play Console flows yet (internal testing track, uploads, etc.), here’s my end-to-end publishing walkthrough: Publish Expo App to Google Play with GitHub Actions.
To authenticate the exchange of information between your app and the Facebook, you need to generate a release key hash and add this to the Android settings within your Facebook App ID. Without this, your Facebook integration may not work properly when you release your app to the store.
Key hash is a base64 encoded SHA-1 fingerprint of your Play app, found in Play Developer Console, Test and Release, App Integrity, App signing, Sha-1 at the top of the page, under App signing certificate.
To convert it to Facebook:
echo -n <SHA1> | xxd -r -p | openssl base64 | pbcopyWhen setting key hashes, same logic applies like if you ever had to configure hashes for e.g. google login setup. You need one for production, one for development. To get the development, run:
eas credentials -p androidSelect your profile, and then copy the SHA1 and run this:
echo -n <EAS_SHA1> | xxd -r -p | openssl base64 | pbcopyWhen selecting what to log, select both Log In-App Purchases Automatically , Log In-App Subscriptions Automatically. Second is optional, but why not? For that option you'll need to create a service account and invite it to Play console. See instructions https://developers.facebook.com/docs/app-events/getting-started-app-events-android/credentials/. If you’re doing subscription tracking, it’s worth validating your purchase flow first: In-App Subscription Testing with Google Play Sandbox.
For Android integration with Facebook, also double check with official doc https://developers.facebook.com/docs/android/getting-started
Step 2 - RevenueCat Integration
I'm using RevenueCat to handle purchases. If you're starting from scratch, here's the full setup: Configure Subscriptions in Expo using RevenueCat.
RevenueCat can send subscription lifecycle events to Meta if properly configured.
To configure it, go to Revenuecat project -> Integrations and find the Meta Ads Integration. You'll enter the App Id and client token.
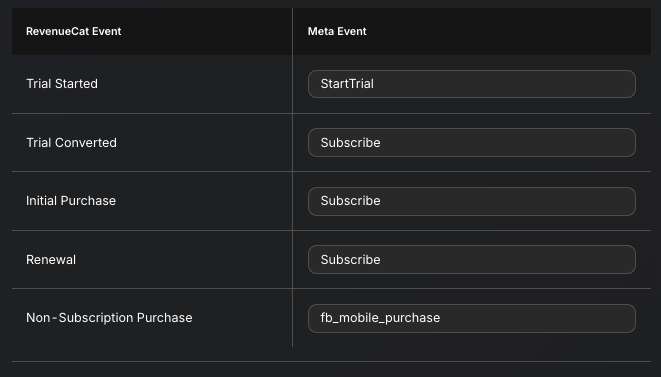
RevenueCat will automatically collect these events...
Step 3 - Coding part
I use react-native-fbsdk-next, it works well with expo managed apps.
I confirm that [email protected] works with expo@54.
Add this to expo app configuration:
    [
      'react-native-fbsdk-next',
      {
        appID: '<appid>',
        clientToken: '<clienttoken>',
        displayName: '<displayname>',
        scheme: '<scheme>',
        advertiserIDCollectionEnabled: true,
        autoLogAppEventsEnabled: true,
        isAutoInitEnabled: true,
      },
    ],
With just this minimal setup, you get automatic tracking of app installs.
If you followed RevenueCat Meta integration, you need one more step.You need meta attribution - each rc customer gets an anonymous facebook id. Place this somewhere in your code:
const fbAnonId = await AppEventsLogger.getAnonymousID();
await Purchases.setFBAnonymousID(fbAnonId);
If you don't set it, RevenueCat can still send events, but matching is weaker, so attribution and optimization tend to be worse (more "unattributed" conversions).
If you've set everything correctly, published your app, you should start getting events in Meta Event Manager. Events in Events Manager can take a bit to appear, and iOS match rates are typically worse if ATT isn't granted. If you also want a clean analytics baseline (events you own, not just ad attribution), this pairs nicely with: Google Analytics in Expo: Firebase Setup for Native and Web.
Youtube: https://youtu.be/vtzafiedQWk


