
To ensure the security of your Linux system, it's important to properly configure SSH access. This guide walks you through the steps to secure your server by configuring SSH access, which includes disabling the root login, setting up a user for SSH, and implementing a key-based authentication.
If using AWS ec2, root login is already disabled, you login with ec2-user and with ssl certificates. Optionally, keep reading to enable passwordless login.
This article is not for ec2 instances, there's a different tutorial you might be interested in.
If you're using something like Hetzner, keep reading...
My configuration for passwordless ssh access is tested for Ubuntu machine.
AWS compared to Hetzner - Hetzner is cheaper
Before transitioning to AWS, I had a very positive experience with Hetzner. You can go much cheaper with Hetzner than with aws. Hetzner has clearer pricing model compared to aws. AWS can be free when starting, might seem even cheaper in some cases, but with AWS everything is charged. The main reason I moved to AWS was to advance my professional skills. The companies I've worked for use Amazon Web Services as their cloud solution. I wanted to become proficient in AWS services by working on my own hobby projects.
I also like flashy new things, and AWS has many - Last time I've checked it was 182 aws services in the console. How can I resist?!
Secure your server and configure passwordless ssh access
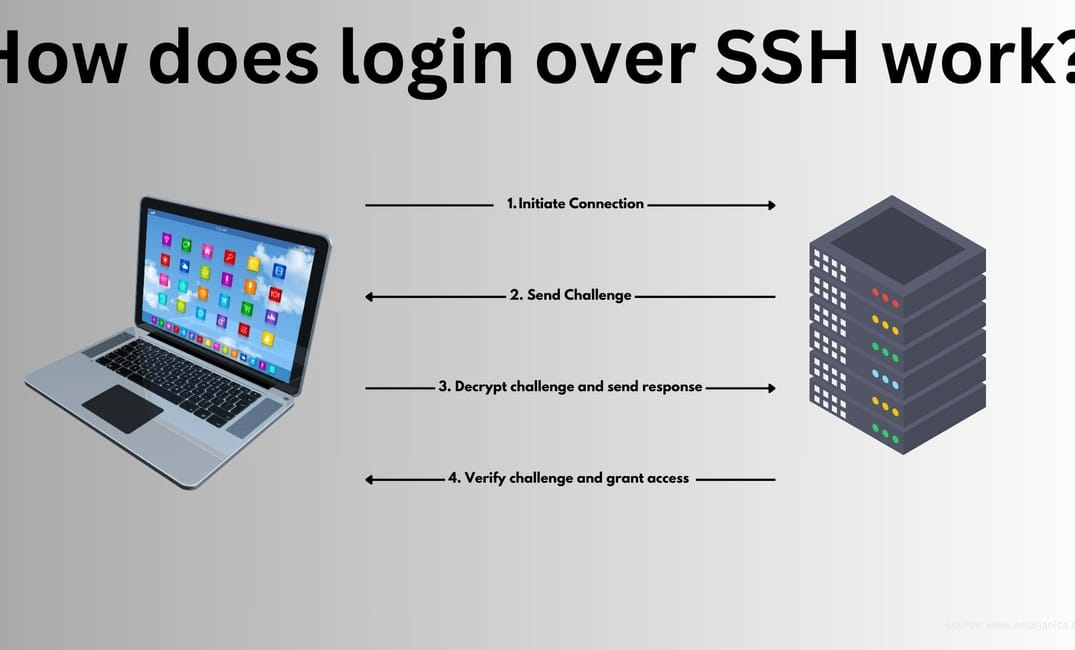
Signing in over ssh is a mechanism that uses a pair of cryptographic keys: a public key and a private key.
Private key is never shared, and public key can be shared without compromising security.
When you initiate a connection over ssh, this is what happens (in 4 steps):

This is how you can configure passwordless SSH login:
- Generate an SSH key pair on your local machine:
ssh-keygen -t rsa - On your server, prepare the directory and file to store authorized keys:
ssh root@hostname 'mkdir -p .ssh && touch .ssh/authorized_keys' - Upload your public SSH key to the server:
cat ~/.ssh/id_rsa.pub | ssh root@hostname 'cat >> .ssh/authorized_keys'Try to log in to the server again - it should no longer require a password.
You're not done yet - disable root login and disable user/pass login!
By disabling the root login you'll prevent attackers from directly accessing the root admin account.
It's still going to be accessible, but through another user.
Also, when the root login is disabled, you can track user actions by looking in the /var/log/auth.log.
To disable the root login, begin by accessing your server with root credentials to enhance the security of your Ubuntu server. Use the command below to log in:
ssh root@hostnameOnce logged in, add a new user and grant administrative privileges:
adduser foobar visudoBelow the # User privilege specification, add the following line to give sudo access to the new user:
foobar ALL=(ALL:ALL) ALLSave the file and exit. Now, configure SSH to disable root login by editing the SSH configuration:
nano /etc/ssh/sshd_configAt the end of the file, add these changes:
# Disable root login
PermitRootLogin no

# Allow specific users
AllowUsers foobar

# Disable password authentication
PasswordAuthentication no

# Enable public key authentication
PubkeyAuthentication yes

# Other security settings
PermitEmptyPasswords no
Btw, for disabling the password auth on ubuntu server, check also /etc/ssh/sshd_config.d/* files and set PasswordAuthentication to no or delete those files. Or a cleaner way to do it is to not change the sshd_config but add changes in the /etc/ssh/sshd_config.d/*.
Save the changes and check the configuration:
sudo sshd -tYou can check the actual configuration with:
sudo sshd -T
If it reports no errors, you can restart the SSH service to apply them:
sudo service ssh restartAt this point, you should be able to log in with the foobar user with just the certificate.
Change SSH Port
Changing the default SSH port is an optional but recommended security measure to reduce the volume of unauthorized login attempts visible in /var/log/auth.log. Here’s how you can change it:
- Open the SSH configuration file:
nano /etc/ssh/sshd_config- Find the line
# Port 22, uncomment it, and change22to a port of your choice: - Save the file and exit, then reload the SSH service to apply the change:
ssh reload- Login to your server using the new SSH port to verify that everything is configured correctly:
ssh root@hostname -p <your_new_ssh_port>By following these steps, you can effectively configure SSH access on your Linux server, significantly enhancing its security. These configurations ensure that your server is safeguarded against unauthorized access attempts, making it robust against potential threats.
Save Server Aliases using the Hosts File (Optional)
You may want to give your server ip a nickname. Edit your hosts file with admin privileges and add:
1.2.3.4 hostname
To save a server alias using the hosts file on Linux you would edit the /etc/hosts and in Windows /c/Windows/System32/drivers/etc/hosts file.


