In my previous article, I explained how using conventional commit messages can automate various processes, such as generating changelogs, and automating version bumps.
In this article, I'll show you how. You can automate your GitHub releases using the release-please GitHub workflow.
Are you already following the conventional commits standard? If yes, then skip to how to generate release PRs, otherwise keep on reading. I'll go over the basics first, then the integration.
What are Conventional Commits
Conventional commits are a standard for writing commit messages that follow a defined format with the purpose of achieving clarity, consistency, and automation. A typical commit message would look like:
<type>(<scope>): <description>- Type: Indicates the nature of the change. Common types include:
feat: A new featurefix: A bug fixdocs: Documentation changesstyle: Code style changes, Linter fixes (formatting, missing semicolons, etc.)refactor: Code refactoring without adding features or fixing bugstest: Adding or modifying testschore: Miscellaneous tasks like build processes or auxiliary toolsci: Changes to continuous integration scripts
- Scope: An optional component that specifies the part of the codebase affected by the change (e.g., Github, Auth, Admin).
- Description: A brief summary of the change.
Using Commitizen for Conventional Commits
Commitizen is a great tool that simplifies writing conventional commit messages. Instead of commiting with git commit -m , use git cz commit which will start an interactive prompt. Answer a few questions and commitizen will save a commit message that follows the conventional commits style. For example, initial prompt looks like the picture below:
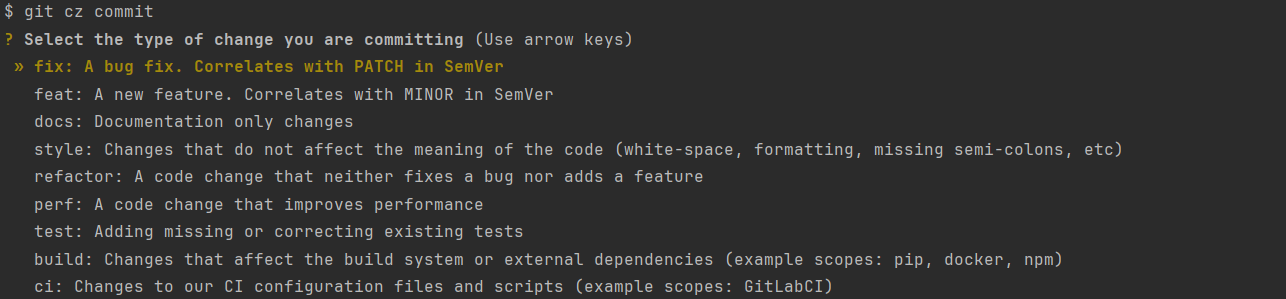
If you think that using commitizen is an overkill, you could always ditch using commitizen and just follow the conventional commits style when writing commit messages. I'm just mentioning it here this tool exists, it's quite popular. I'm using the Python version cli, but there's also a node version.
What is Release Please about?
Release please is a language agnostic release managing tool made by Google. It focuses on the textual information extracted from commits, not the code itself. This makes it independent of the programming language used in your project. Many of Google's projects (like Puppeteer and Angular) use release-please for managing releases. If it's good enough for Google, it's good enough for me!
To Squash or Not To Squash
Release please (well, Google's) guidelines suggests that squashing commits into a single commit when merging to the main branch is a good practice - nicer and cleaner looking git tree, easier bug tracking and whatever.
I disagree. I do have a practice for minimizing a number git commits right before creating a PR, but I don't always squash all commits into a one monolithic commit.
What happens when you squash all those feature branch commits?
You get a big pile of c...ommits merged into a single commit that is supposedly more maintainable.
Noise is what I see, when I have too look into that monolithic commit monster. I lose the context on which parts of the code was the fix or the feature applied to.
I have to scroll a lot. Not good.
I prefer a more logical approach. If certain commits belong together, I may combine them into fewer commits, but I always strive to maintain clarity and context. This way, the commit history remains both informative and manageable.
Less commits is better, but use your common sense.
What kind of versioning does Release Please use?
Release-please utilizes semantic versioning (semver) because conventional commits are designed to map directly to the rules of semantic versioning. By categorizing commits into types such as feat, fix, and chore, it's possible to automatically determine the appropriate version bump (major, minor, or patch) based on the changes introduced.
Do you need to use semver? No, you don't. There are cases where semver will not be the best option, like a situation where one man's bugfix is another man's breaking change. That's why release-please has an option release-as, where you can add your incremented numeric version or calver version or whatever you use.
It can still be automated, you just have to adjust the configuration for versioning.
Use the Release Please GitHub Action
Now that I've covered what's release please about, I'll go over the actual integration using the release please GitHub workflow.
Example code on GitHub
To explain how the configuration works I've created a github release-please monorepo repository containing sample projects featuring:
- hello world in React
- hello world in Rust crate
It might be easier if you follow along by watching my Youtube tutorial on automating GitHub releases.
Configuration explained
Release please automation would not be possible without these 3 important configuration files:
- .release-please-manifest.json - source of truth for Release Please, stores information about the current versions of your project's packages. For example, if you were using a Cargo workspace, you would still need to declare your crates in the manifest.
- release-please-config.json - central configuration hub, defining default options and settings for your releases. It works hand-in-hand with the
.release-please-manifest.jsonfile (which tracks version numbers). If you're working with multiple projects, separating them in different releases and pull requests is a cleaner approach. Specifying apathpoints release-please to your project, and defining arelease-typetells it which strategy to apply - full list of supported strategies. - release-please.yml - GitHub workflow that will trigger release-please. .release-please-manifest.json and release-please-config.json would need to exist in the GitHub repository for this workflow to work.
Watch out for permissions in the workflow
Your workflow needs to be able to create a PR, modify files (versioning, changelog) and write to releases. You need to assign contents write and pull-requests write permissions. You also need to assign a token to authenticate your action. GITHUB_TOKEN is present in any ci workflow, so you can use that.
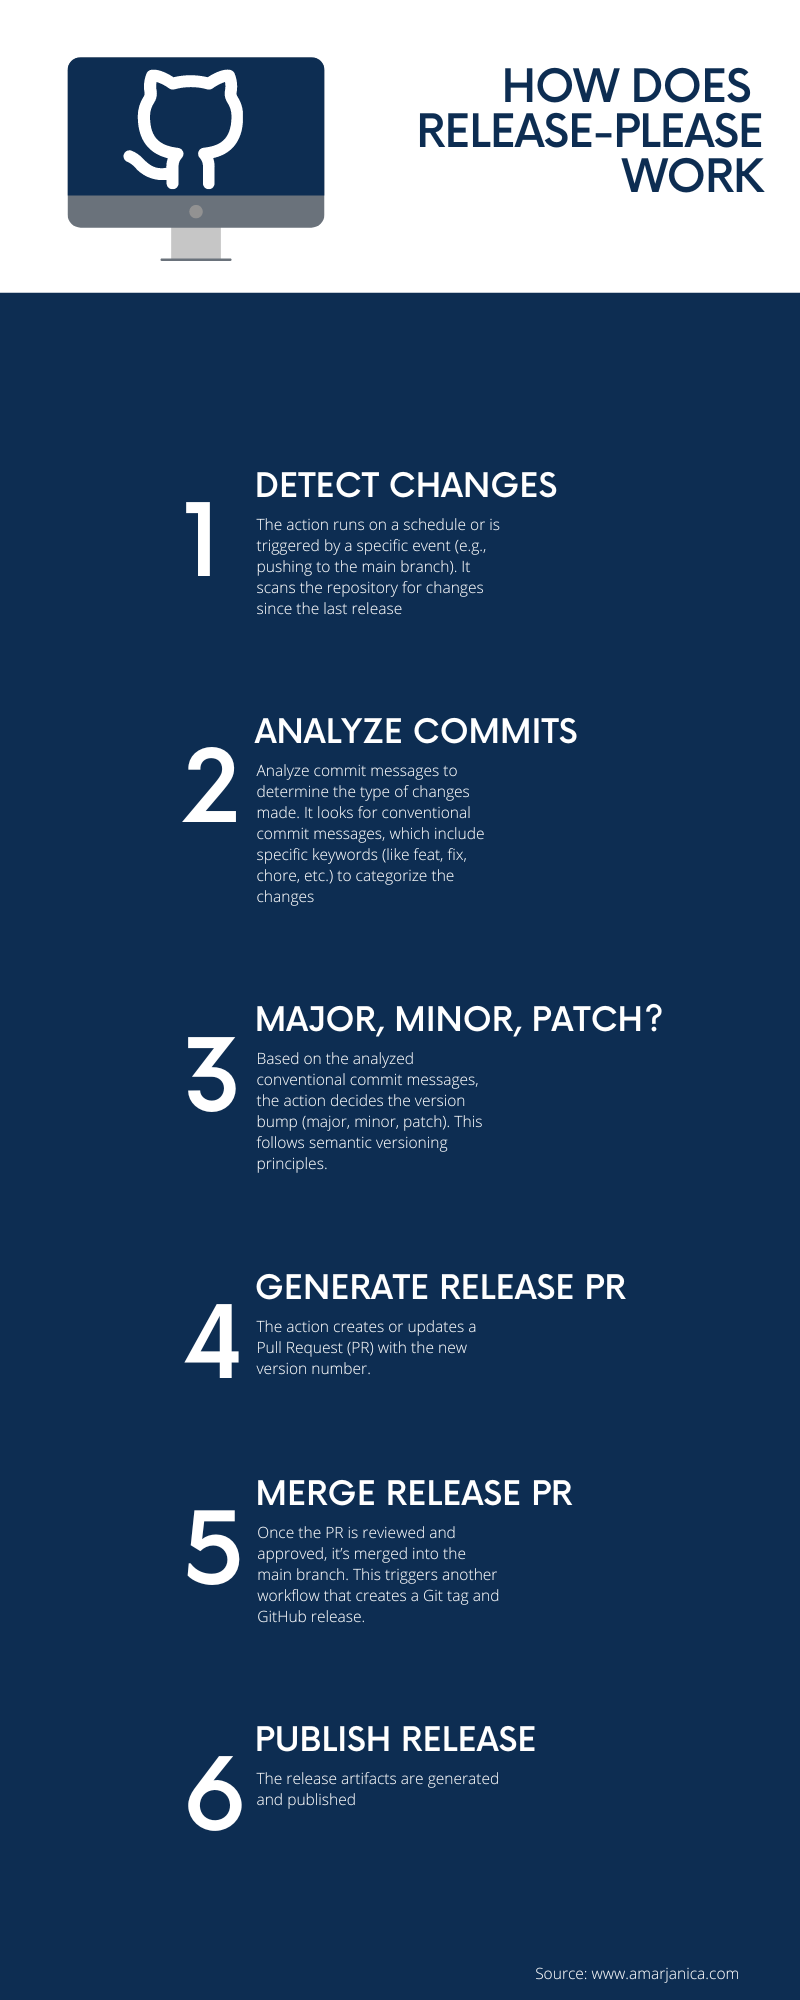
How release-please Works:
Release please will not trigger a release if there is nothing to release (major - breaking, minor- feat, patch - fix)!
- Detect Changes: The action runs on a schedule or is triggered by a specific event (e.g., pushing to the main branch). It scans the repository for changes since the last release.
- Analyze Commits:
release-pleaseanalyzes commit messages to determine the type of changes made. It looks for conventional commit messages, which include specific keywords (likefeat,fix,chore, etc.) to categorize the changes. - Determine Version Bump: Based on the analyzed commit messages, the action decides the version bump (major, minor, patch). This follows semantic versioning principles.
- Generate Release PR: The action creates or updates a Pull Request (PR) with the new version number. This PR includes:
- Updated version in the
package.jsonor equivalent file. - Changelog with all the changes since the last release.
- Any other release notes.
- Updated version in the
- Merge Release PR: Once the PR is reviewed and approved, it’s merged into the main branch. This triggers another workflow that creates a Git tag and GitHub release.
- Publish Release: The release artifacts are generated and published. This could include publishing to package registries (like npm for JavaScript projects).
Debugging release-please outputs
I didn't have a better idea than to add this step:
- name: Print release outputs continue-on-error: true run: | echo "Release outputs:" echo "${{ toJson(steps.release.outputs) }}"
toJson command might fail, but you can expand to see what the outputs are.
If you have a better solution, please let me know in the comments.
Hooking on release-please
When a new release is created you might want to add jobs that run just after it.
It's important to note that if you are using a monorepo configuration, you always rely on outputs that are prefixed by your package path.
For example, if your release is for package named hello-react, outputs from release-please are:
{
    "hello-react--release_created": "true",
    "hello-react--id": "157463793",
    "hello-react--name": "hello-react: v0.2.0",
    "hello-react--tag_name": "[email protected]",
    "hello-react--sha": "...",
    "hello-react--body": "## [0.2.0]....",
    "hello-react--html_url": "https://github.com/user/repo/releases/tag/hello-react%40v0.2.0",
    "hello-react--draft": "false",
    "hello-react--upload_url": "https://uploads.github.com/repos/user/repo/releases/157463793/assets{?name,label}",
    "hello-react--path": "hello-react",
    "hello-react--version": "0.2.0",
    "hello-react--major": "0",
    "hello-react--minor": "2",
    "hello-react--patch": "0",
    "paths_released": "[\"hello-react\"]"
}
If you would like to trigger another job after release is created (not a step), you need to propagate outputs from the step to the job:
jobs:
  release-please:
    runs-on: ubuntu-latest
    outputs:
      hello-react--tag_name: ${{ steps.release.outputs.hello-react--tag_name}}
      hello-react--release_created: ${{ steps.release.outputs.hello-react--release_created}}
    steps:
      - uses: googleapis/release-please-action@v4
        id: release
        with:
          token: ${{ secrets.GITHUB_TOKEN }}
          config-file: release-please-config.json
          manifest-file: .release-please-manifest.json
Kinds of jobs that you'd like to trigger after release is created will depend on you. I for example would like to add more artifacts to my release:
release-hello-react:
    if: ${{needs.release-please.outputs.hello-react--release_created}}
    runs-on: ubuntu-latest
    needs: release-please
    steps:
      # ...todo: checkout, install and build
      - run: zip -r hello-react-build.zip hello-react/build
      - name: Upload Release Artifact
        env:
          GITHUB_TOKEN: ${{ secrets.GITHUB_TOKEN }}
        run: gh release upload ${{ needs.release-please.outputs.hello-react--tag_name }} hello-react-build.zip
And that's it.
Conclusion
Example release setup is available in my GitHub repo. To understand how releases work, you can fork the repo and play with conventional commits and releases. You could also watch my Youtube video what I did to understand when what happens and why. Let me know if you would like to cover additional topics on release-please workflow.