
To show you how I work with mongodb in js projects, I'll setup a simple project and I'll go step by step from setup to publish.
What might be useful for you here:
- Setup mongoose in typescript
- Recursive parent and descendant traversal
- How to do geospatial queries with mongoose
- Unit testing Mongoose with embedded memory Mongodb
- How to read and publish from a private github npm registry
If you want to skip forward and take a look at the github repo, go right ahead!
Project setup
Initialize github repository
mkdir demo-mongoose-typescript
cd demo-mongoose-typescript

echo "# demo-mongoose-typescript" >> README.md
git init
git add README.md
git commit -m "first commit"
git branch -M main
git remote add origin [email protected]:amarjanica/demo-mongoose-typescript.git
git push -u origin main
add .gitignore file
.idea/
coverage/
node_modules/
package-lock.json
dist/
Configure typescript project
npm init
tsc --init
npm i --save mongoose
Copy tsconfig.js to tsconfig.test.js - tests folder needs to be compiled only when you run tests.
Edit tsconfig.js and set outdir to be dist, and add include and exclude. Set "declaration" to true, otherwise import could complain there's no declaration file. My final tsconfig.json looks like:
{
  "compilerOptions": {
    "target": "es2016",
    "module": "commonjs",
    "outDir": "./dist",
    "esModuleInterop": true,
    "forceConsistentCasingInFileNames": true,
    "strict": true,
    "declaration": true,
    "skipLibCheck": true,
    "paths": {
      "@models/*": ["./src/*"]
    }
  },
  "include": [
    "src/**/*.ts"
  ],
  "exclude": [
    "tests",
    "node_modules"
  ]
}
Configure testing
npx jest --init
npm i jest @types/jest ts-jest mongodb-memory-server --save-dev
Add a setting in jest.config.js, uncomment transform and instruct ts-jest to compile from tsconfig.test.js:
transform: {
    '^.+\\.tsx?$': [
      'ts-jest',
      {tsconfig: './tsconfig.test.json'},
    ],
  },
My final jest.config.js looks like this:
module.exports = {
  clearMocks: true,
  collectCoverage: true,
  coverageDirectory: "coverage",
  coveragePathIgnorePatterns: [
    "/node_modules/",
    "<rootDir>/tests/"
  ],
  transform: {
    '^.+\\.ts$': [
      'ts-jest',
      {tsconfig: './tsconfig.test.json'},
    ],
  },
  watchman: false,
  preset: 'ts-jest',
  moduleNameMapper: {
    '^@models/(.*)$': ['<rootDir>/src/$1'],
  },
};
Edit package.json and add command "test": "jest".
Configure linting
npm i --save-dev @typescript-eslint/eslint-plugin
npx eslint --init
Edit package.json and add command "lint": "eslint src/**/*" - linting only src folder.
Configure formatting
It's good to be consistent in your codebase, and writing a rule like .editorconfig and adding a checker/fixer like prettierc should help with that.
Add .editorconfig file, and add something like example below, so your IDE reformats everything according to this:
root = true

# Global
[*]
indent_style = space
indent_size = 2
end_of_line = lf
charset = utf-8
trim_trailing_whitespace = true
insert_final_newline = true
Just to be extra safe, install prettier package, which should scream if the code is not formatted well.
npm i prettier --save-devPrettier should read that there's an .editorconfig in project. But, editorconfig has limited options, like missing printWidth. That's why I'll add .prettierrc.json and edit:
{
  "trailingComma": "es5",
  "tabWidth": 2,
  "semi": true,
  "singleQuote": true,
  "printWidth": 120
}
"prettier": "prettier --write \"./(src|tests)/**/*.ts\""And add a script in package.json
Configure Git pre-commit hook
Although most of continuous integration steps will be run in a pipeline, such as lint and test, I don't want badly formatted code to end up on upstream. For that purpose, I'll create a .git/hooks/pre-commit. To learn more about git hooks, read this article.
chmod +x .git/hooks/pre-commitAdd:
#!/bin/sh

GREEN="\033[0;32m"
NC='\033[0m' # No Color

echo -e "${GREEN}Running formatting${NC}"

npm run prettier
Next time when you try to commit your code, pre-commit script is called first, and should check and reformat all your code in the source directory.
And finally...github workflow
I want for lint and test commands to run on every push and pull request to the main branch, so I'll add .github/workflows/ci.yml:
name: Continuous Integration

on:
  push:
    branches: [ main ]
  pull_request:
    branches: [ main ]

jobs:
  build:

    runs-on: ubuntu-latest

    strategy:
      matrix:
        node-version: [15.x, 16.x]

    steps:
      - uses: actions/checkout@v3
      - name: Use Node.js ${{ matrix.node-version }}
        uses: actions/setup-node@v3
        with:
          node-version: ${{ matrix.node-version }}
      - run: npm i
      - run: npm run lint
      - run: npm test
On next push, github will pick up this configuration and run in Actions tab.
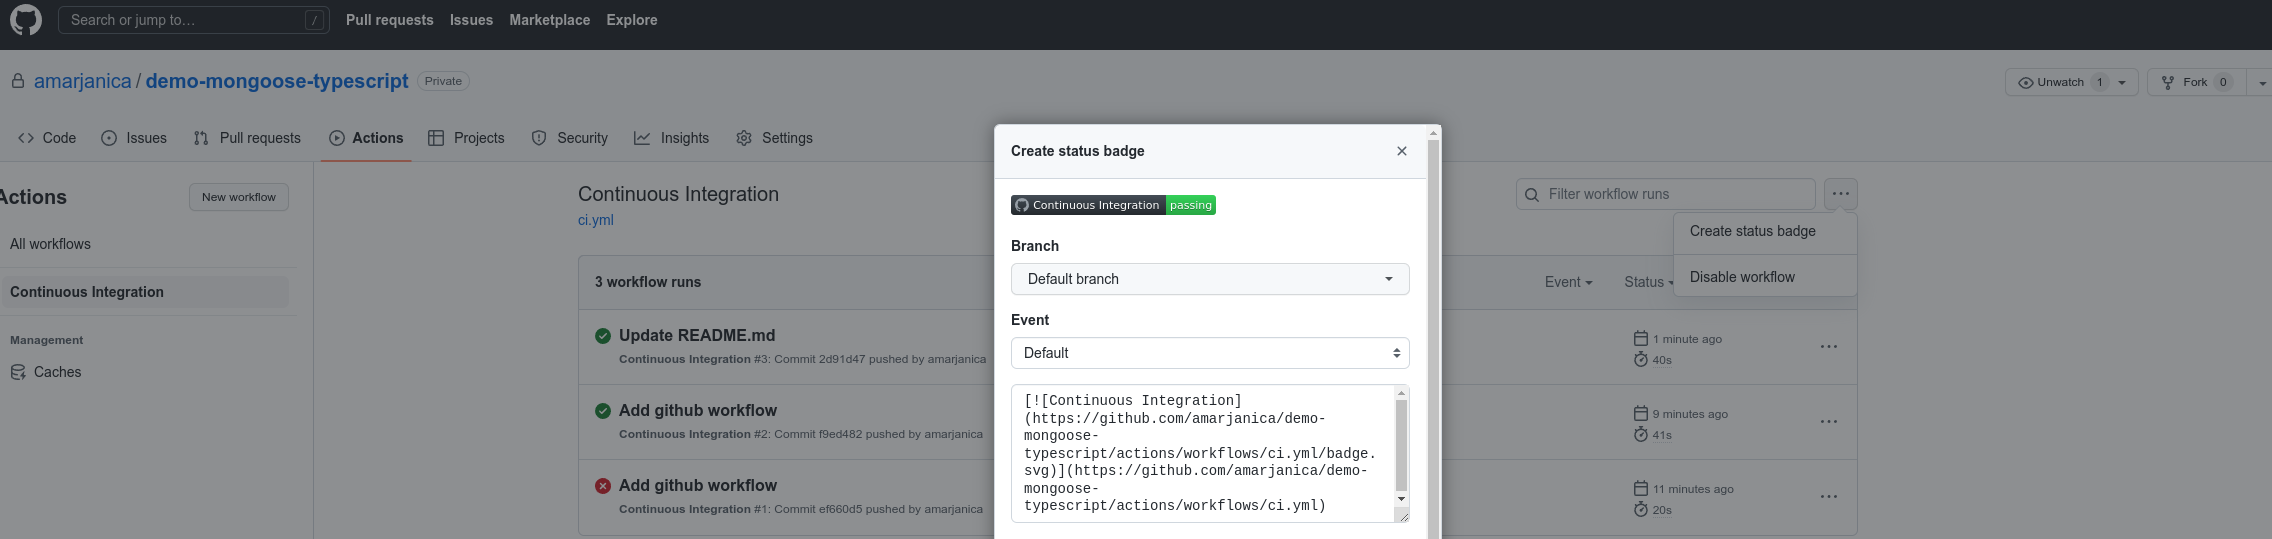
One final step in configuring, and we're done. I want to add a ci status badge in the README.
Diagram
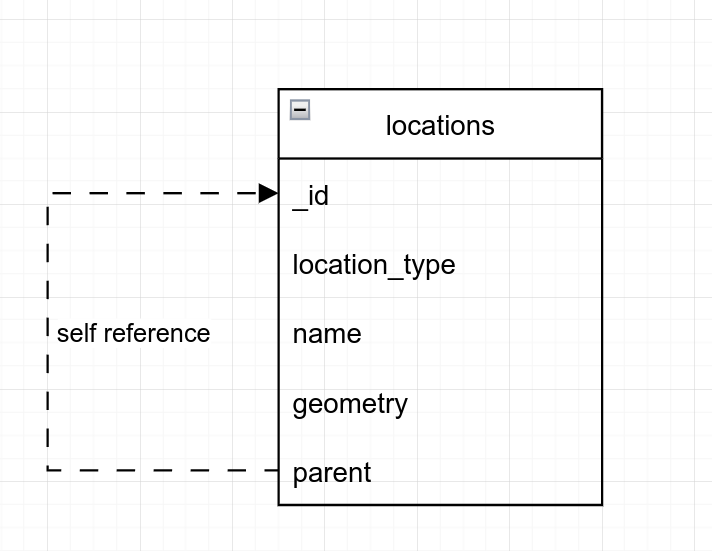
I'll use a simple location model. It's perfect for showing how to do geo lookups.
There are 3 kinds of location types here, country, city and district.
Configure Mongoose Schema
Like demonstrated in diagram, our location schema will look like this:
export enum LocationType {
  COUNTRY = 'country',
  CITY = 'city',
  DISTRICT = 'district',
  UNKNOWN = 'unknown',
}

export interface ILocation {
  _id: Types.ObjectId;
  name: string;
  location_type: LocationType;
  geometry: { type: string; coordinates: number[] };
  parent?: ILocation;
}

const LocationSchema = new Schema<ILocation>({
  name: { type: String, required: true },
  location_type: { type: String, enum: LocationType, default: LocationType.UNKNOWN },
  geometry: GeometryField,
  parent: {
    type: mongoose.Schema.Types.ObjectId,
    ref: 'Location',
  },
});

export default (mongoose.models.Location as unknown as Model<ILocation>) ||
  mongoose.model<ILocation>('Location', LocationSchema);
Last line, the default export line, is a "short circuit" declaration. Meaning:
- if there's already a compiled schema a.k.a Location model, then export the model. You'd probably need something like this if you cache your mongoose connection.
- if schema has not been compiled yet, then compile it and export the result, a.k.a Location model.
Validation
Mongoose has a built-in validation middleware. Most basic validation you can add is the required attribute. If you don't want a generic message, then define a message field.
If you want a more fine-grained validation, you can do so by adding a validate definition.
For example, look at the geometry validation. Longitude can be in range [-180, 180], and latitude is [-90, 90]. You might notice, longitude is written first. GeoJson specification says that longitude should be first, and latitude second.
Validation is processed on model pre save. If you want to disable the hook, then add:
LocationSchema.set('validateBeforeSave', false);
You can call the validation explicitly, like I do in my test cases:
describe('Location Validation', () => {
  it('is invalid if properties are not defined', async () => {
    const location = new Location({});
    const error = location.validateSync();

    expect(error?.message).toContain('Geometry is required!');
    expect(error?.message).toContain('Path `name` is required.');
  });
});
Recursive Lookups
In my example, I define 2 types of recursions, one going up (parents lookup) and one going down (descendants lookup). You can do recursive queries in mongodb with graphLookup aggregation pipeline.
Descendants traversal
I defined two instance methods, where I want to sometimes see parents or descendants of a location.
For descendants, initial value for recursion is _id field. Next rounds of recursion will look at parent field.
And recursion boundary condition for stopping will be a null parent.
LocationSchema.method('descendants', function () {
  return mongoose.model('Location').aggregate([
    {
      $match: {
        _id: this._id,
      },
    },
    {
      $graphLookup: {
        from: 'locations',
        startWith: '$_id',
        connectFromField: '_id',
        connectToField: 'parent',
        as: 'descendants',
        depthField: 'level',
        maxDepth: 3,
      },
    },
    { $unwind: '$descendants' },
    { $replaceRoot: { newRoot: '$descendants' } },
  ]);
});
You might want to add a maxDepth field just in case. If you accidentally set a location which is it's own parent, then you end up with an infinite recursion. Then again, setting that property could hide an error in your design.
Parents traversal
Same logic as with descendants, just the opposite direction.
LocationSchema.method('parents', function () {
  return mongoose.model('Location').aggregate([
    {
      $match: {
        _id: this._id,
      },
    },
    {
      $graphLookup: {
        from: 'locations',
        startWith: '$parent',
        connectFromField: 'parent',
        connectToField: '_id',
        as: 'parents',
        depthField: 'level'
      },
    },
    { $unwind: '$parents' },
    { $replaceRoot: { newRoot: '$parents' } },
  ]);
});
Geospatial Lookups
For a geospatial lookup to be possible, schema has to define a 2dsphere index. In my example, one is defined on the geometry field. Let's define a nearby locations static method:
LocationSchema.static('nearby', (lat: number, lng: number, distanceKm: number) => {
return mongoose.model('Location').aggregate([
{
$geoNear: {
near: { type: 'Point', coordinates: [lng, lat] },
distanceField: 'distance',
minDistance: 0,
maxDistance: distanceKm * 1000,
includeLocs: 'geometry',
spherical: true,
},
},
]);
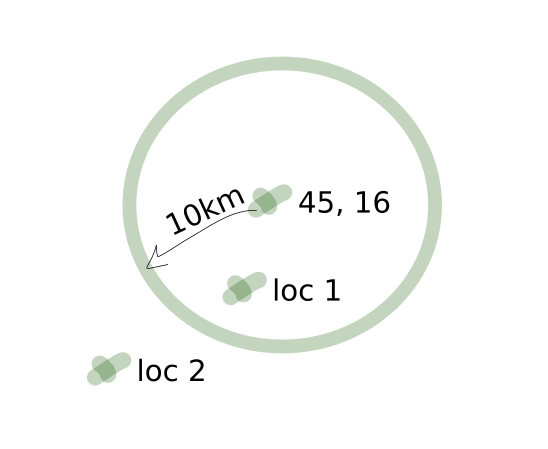
});when calling a Location.nearby(45, 16, 10) with latitude, longitude and distance in kilometers, mongoose will lookup for those geometries that are inside a radius of 10 kilometers with center of 45, 16.
I think this sketch might make it clearer:
Static and instance methods
This is a skeleton of how I define a mongoose schema.
export interface ILocation {}

export interface ILocationMethods {}

export interface ILocationModel extends Model<ILocation, {}, ILocationMethods> {}

const LocationSchema = new Schema<ILocation, ILocationModel, ILocationMethods>({...})

export default (mongoose.models.Location as unknown as ILocationModel) ||
  mongoose.model<ILocation, ILocationModel>('Location', LocationSchema);
The interface ILocation is a view model specification, just contains all properties that should be defined on a schema.
The interface ILocationMethods defines instance methods. In this example, only instance methods are descendants and parents.
Instance methods
You specify an instance method by declaring it in ILocationMethods interface:
export interface ILocationMethods {
  descendants(): Promise<ILocation & { level: number }[]>;

  parents(): Promise<ILocation & { level: number }[]>;
}
And instance method implementation is defined in:
LocationSchema.method('descendants', function () {...});Static methods
You specify a static method by declaring it in ILocationModel interface:
export interface ILocationModel extends Model<ILocation, {}, ILocationMethods> {
  nearby(lat: number, lng: number, distance: number): Promise<ILocation & { distance: number }[]>;
}
Static method implementation is done like:
LocationSchema.static('nearby', (lat: number, lng: number, distance: number) => {...}Sometimes it makes more sense to add an instance method, and sometimes a static method. Depends on your usecase...
Caching Connections
You'll need to cache your connection. Unless you're using an aws lambda, and even then I'd cache.
If just calling a mongoose.connect on every find or save, you'll soon find out there's just so much connections you can make. Connections will eventually stack up. Even if you remember to close the connection, just connecting and closing will slow down your request. What if a user calls your rest api few dozen times in a second?
There's an example utility in my unit tests, called db-connect.
import { MongoMemoryServer } from 'mongodb-memory-server';
import { Mongoose } from 'mongoose';
import mongoose from 'mongoose';

declare let global: typeof globalThis & {
  cached: {
    conn: Mongoose | null;
    promise: Promise<Mongoose> | null;
    mongod: MongoMemoryServer | null;
  };
};

type CachedType = {
  conn: Mongoose | null;
  promise: Promise<Mongoose> | null;
  mongod: MongoMemoryServer | null;
};

let cached: CachedType = global.cached;
if (!cached) {
  cached = global.cached = { conn: null, promise: null, mongod: null };
}

export async function connect() {
  if (cached.conn) {
    return cached.conn;
  }

  cached.mongod = await MongoMemoryServer.create();
  const uri: string = cached.mongod.getUri();

  if (!cached.promise) {
    cached.promise = mongoose.connect(uri, {
      bufferCommands: false,
    });
  }
  cached.conn = await cached.promise;
  return cached.conn;
}

export async function close() {
  if (cached.mongod) {
    await mongoose.connection.dropDatabase();
    await mongoose.connection.close();
    await cached.mongod.stop();
    cached = { conn: null, mongod: null, promise: null };
  }
}

export async function clear() {
  if (cached.mongod && cached.conn) {
    const collections = cached.conn.connection.collections;

    for (const key in collections) {
      const collection = collections[key];
      await collection.deleteMany({});
    }
  }
}
If connection is already made, it's stored in a global scope. Closing the connection means closing the mongoose connection and clearing the reference from global scope. db-connect is a utility for unit tests, which means it creates a new database on every unit test run.
  beforeAll(async () => {
    await connect();
    await populate();
  });

  afterAll(async () => {
    await clear();
    await close();
  });
All test cases in a describe scenario share the same database. Although this is not a clear code solution, I don't do and modifications to the populate dataset, just queries.
Publish to github private npm registry
If you have a private property defined in package.json, remove it. That's just a safeguard for accidental publishing.
My package.json for publishing should now looks like this (unimportant omitted with ...):
{
  "name": "@amarjanica/demo-mongoose-typescript",
  "version": "1.0.0",
  "description": "",
  "publishConfig": {
    "registry": "https://npm.pkg.github.com"
  },
  "main": "dist/location.js",
  "files": ["dist/**"],
  "scripts": {
    "test": "jest",
    "lint": "eslint src/**/*",
    "prettier": "prettier --write \"./(src|tests)/**/*.ts\"",
    "tsc": "tsc",
    "prepublishOnly": "npm run lint && npm run test && npm run prettier && npm run tsc"
  },
  "repository": {
    "type": "git",
    "url": "git+https://github.com/amarjanica/demo-mongoose-typescript.git"
  },
  "author": "Ana Bujan",
  "license": "MIT",
  "bugs": {
    "url": "https://github.com/amarjanica/demo-mongoose-typescript/issues"
  },
  "homepage": "https://github.com/amarjanica/demo-mongoose-typescript#readme",
  "devDependencies": {...
  },
  "dependencies": {...
  }
}
If you want package to be published to github registry instead of npmjs, than add a publishConfig.
I just want to publish anything inside the build directory, so I specified files and main file.
You'd use it like:
import Location from '@amarjanica/demo-mongoose-typescript';To be able to publish to a github private npm registry, add this to .npmrc:
//npm.pkg.github.com/:_authToken=${GITHUB_WRITE_PACKAGES_TOKEN}
@amarjanica:registry=https://npm.pkg.github.com/
Obtain a GITHUB_WRITE_PACKAGES_TOKEN by going to Settings -> Developer Settings -> Create new token and check write packages. Export the variable.
Note that .npmrc may be defined in your home or project directory.
As for installing from private npm registry, you'd define in project root an .npmrc with:
//npm.pkg.github.com/:_authToken=${GITHUB_READ_PACKAGES_TOKEN}
@amarjanica:registry=https://npm.pkg.github.com/
This procedure makes it easy for me to use private packages in elastic beanstalk containers. I just define a GITHUB_READ_PACKAGES_TOKEN in the container definition of environment variables.
Publishing to github npm registry is now easy as typing a npm publish, which will first run a prePublishOnly script, and then publish to github npm registry.
Conclusion
That sums it up from setup to publishing. Initially my example project was going to be bigger, I wanted to go more in depth for geospatial queries and how I use them. Problem was that my blogpost would not end up in a single blogpost, but maybe a series. I hope this was helpful, let me know what you think!


